by Lance Hill | Jul 17, 2022 | How To, Mirliton
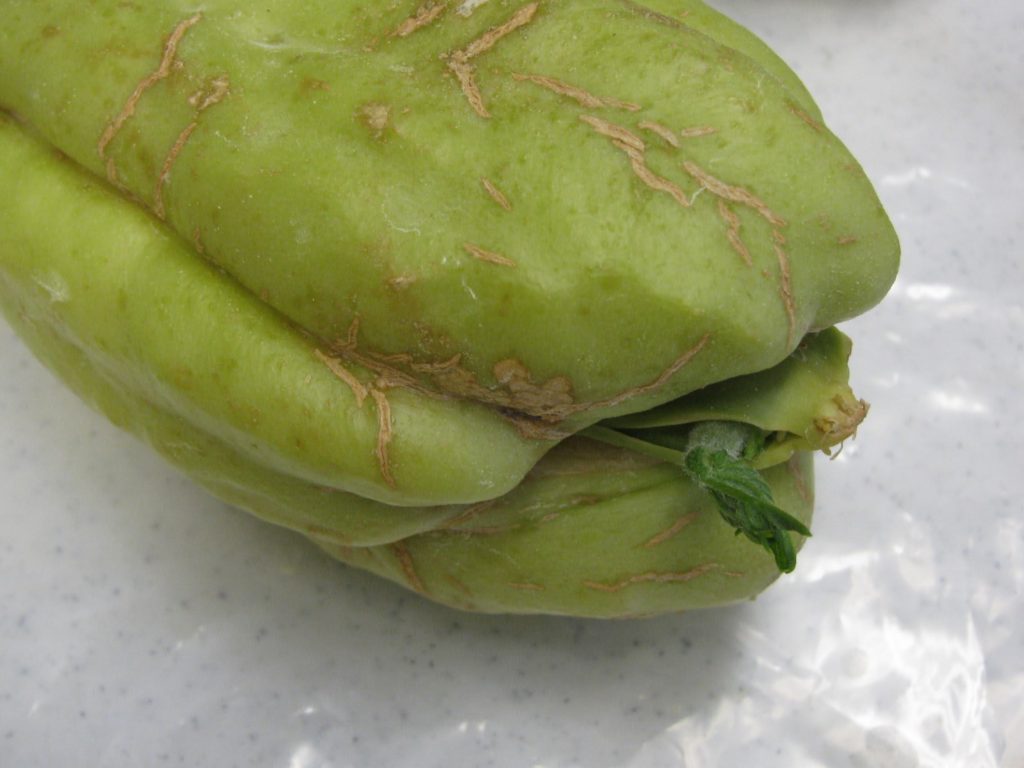
Sprouting mirliton.
We occasionally get a Spring mirliton crop and decide to gift or sell them to others to grow. You could plant them in small containers and sell them that way, but that would mean that potential growers would have to transplant them into the ground during the full heat of the summer. That would be risky. That’s why we recommend that growers sell their fruit as sprouts as soon as possible after picking them. Sprouts can be safely planted in May-June with a simple shade technique (click here). So how do you expedite sprouting?
Mirlitons sprout (germinate) in response to warm weather. Joseph Boudreaux taught me the simple technique for incubating mirlitons in May: Place them in a warm place outside and they’ll sprout within 10-14 days. It’s best to place them away from the direct sun and inside a container such as a milk crate where varmints can’t get them (squirrels, possums, and rats). As soon as they begin to sprout, you can assure people that they are viable seeds and ready to plant.
by Lance Hill | Jul 12, 2022 | How To, Mirliton
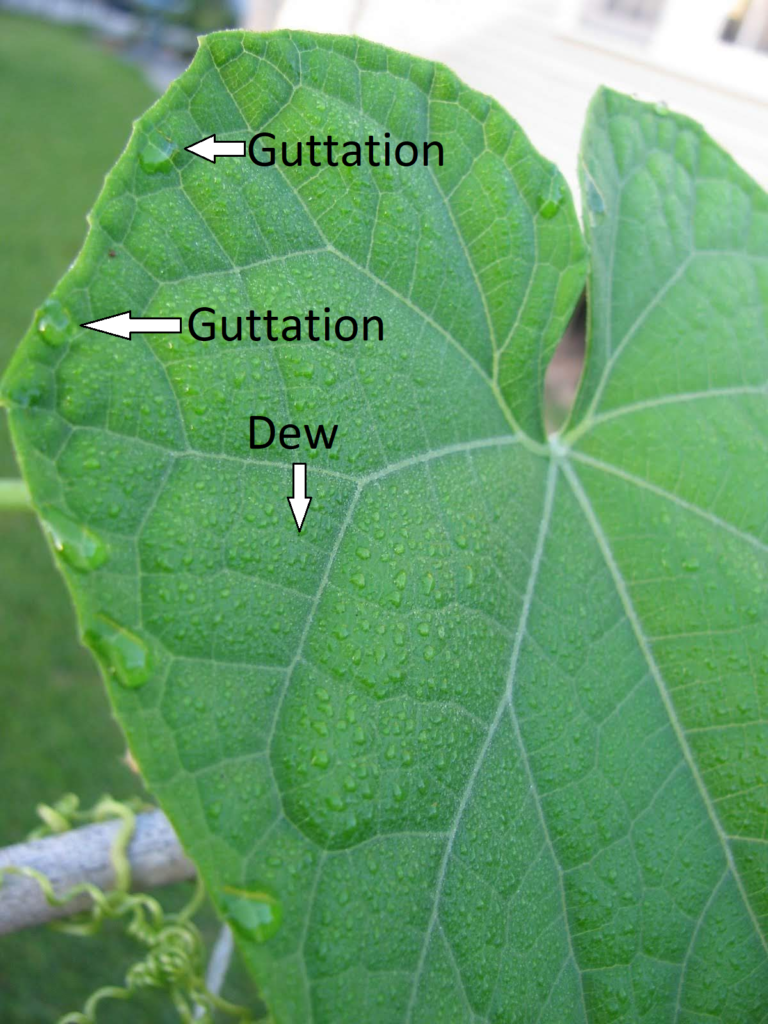
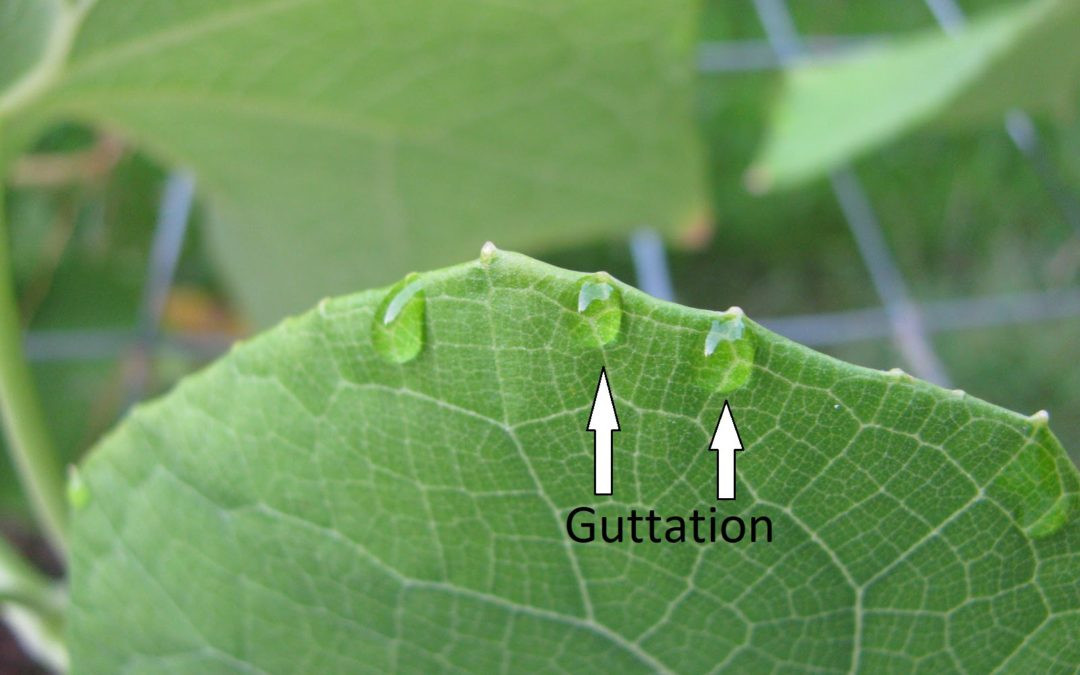
Guttation forming on leaf tips and edges
Your mirliton will tell you every morning how much water its roots are accessing. It is called “guttation.” If there is more than adequate soil moisture available at night, mirlitons will send the excess to the leaves where it will be visible in large droplets on the margins of the leaves. The water exudes from glands at the tip of the leaves. Guttation means the plant has more than enough water; if you don’t see guttation for several days, then it’s probably time to water. Click here for a link to instructional photos of guttation and how to read it (click on each photo for explanations).
by Lance Hill | Jul 12, 2022 | How To, Mirliton

Watering Mirlitons
I could have titled this “How To Water Your Mirliton” but that would be like asking, “How To Care for a Child.” There’s no single answer because each child is different and has different needs at different times in their life. Plants are the same. So this is a set of guidelines instead of rules for watering mirlitons during their three distinct stages in their life cycle.
It used to be said that mirlitons “take care of themselves” and need little care; the increase in hurricanes, floods, and intensive rain days means that is no longer true. Now they need intensive care. No watering technique can remedy a flawed plant site. Mirlitons need quickly draining, well-aerated soil. That means you may have to install drainage (ditches, French drains) in your ground planting; in raised beds, you need lateral exit routes for excess rain, such as side holes or subsurface corrugated pipe. Rapid and wide fluctuations in soil moisture content in your raised bed can stunt growth and hinder flowering and fruiting. These guidelines will generally apply to both planting methods.
Steps to take Before You ever Turn on the Hose:
Get a rain gauge. Place it next to your vine and check it daily. The weather person has no idea how much it rained in your yard—you need to know it for your vine’s health.
Don’t guess about the vine’s water needs. The soil and the leaves will tell you exactly what you need to know if you scout them daily. Learn to read the bamboo stake or soil sampler and the mirliton leaves. They will tell if the vine needs water, and too much water can create a sick vine.
Use a Bamboo Stake or Steel Soil Sampler to gauge soil Moisture: Learn how to use a ½-inch bamboo tomato stake to test soil moisture in the root zone. It will tell you instantly if your vine has too much or too little available moisture. There’s a link at the end of this article to how to read the stake. Or buy a stainless steel soil sampler that allows you see and feel moisture levels beneath the surface (link below)
Check Guttation Daily: Mirlitons will tell you every day if they are quenched or thirsty. Guttation is the droplets of water that form on mirliton leaf edges early in the morning. The presence of guttation means the vine has more than enough available water in the root zone. Three days without guttation mean it probably needs watering. Check the vine first thing in the morning for guttation. Learn to read your mirliton leaves at the link below.
Wilting Does not Mean Water the Vine. A daily wilt in hot weather is normal and healthy mirliton. It’s called “leaf flagging” and it reduces exposure to direct sunlight and toughens the leaves against plant diseases. Watering mirlitons as a reaction to temporary wilt can actually harm the plant. When you see a daytime wilt, wait until the evening and probably see that it recovers.
Never give your vine a shower. That’s a surefire way to start an anthracnose epidemic. The anthracnose pathogens are primarily carried primarily by water through splash-up from the soil or splashed from leaf to leaf. Water gently at ground level with a hose on low, or use drip irrigation.
The Three Stages in the Mirlton Life Cycle:
1. Toddler:
Be careful with the baby. The first impulse when we see a young plant droop is to water our way out of the problem. Don’t do it At the toddler stage, mirlitons are most sensitive to soil moisture issues because their young roots are just emerging. Overwatering is the leading cause of premature death in mirlitons. Prepare for your toddler by installing gentle drip irrigation or an olla. Use the stake and read the leaves daily.
2. Sprawler:
Once the vine is established, it will begin to climb and sprawl. A larger canopy means they need more water. Daily summer showers should provide enough water, but don’t guess–use the stake and read the leaves.
3. Fruiter
The fall is fruiting season and water needs may increase, but use the stake and read the leaves.
Final Thoughts
Watering is not something you simply do to a mirliton vine; it’s something you do with it. It’s a partnership in which both parties have something to say. Listen to your vine.
Bamboo stake instructions here.
Steel Soil Sampler here.
Read the Mirliton Leaves here.
by Lance Hill | Jun 29, 2022 | How To, Mirliton

Ervin Crawford And his Mirliton Vine
In 2008, I was searching for a Louisiana heirloom mirliton to replace the variety I had grown since 1983. The hurricane Katrina flood had killed almost every mirliton in New Orleans. The usual suspects had given me all the normal bad advice: “Buy one at the grocery store. A mirliton is a mirliton. They’ll grow fine.” Nope. I planted, they died; I planted, they died. Over and over.
After a little research, I discovered there were scores of varieties—perhaps hundreds—each adapted to the particular climate and altitude. I had to find the one traditionally grown in Louisiana. I discovered that the Louisiana Department of Agriculture’s monthly Market Bulletin was digitally archived years back. I went through it looking under “fruits and vegetables for sale” and saw one name repeatedly; Ervin Crawford, Pumpkin Center. It was a long shot because the advertisements were decades old, but I called the number. Ervin Crawford answered.
I immediately drove to Pumpkin Center and met him. On that first visit, Ervin gave me about 20 mirlitons and with those 20 plants, I started Mirliton.Org. Ervin played a crucial role in saving the Louisiana heirloom mirliton.
Visiting Ervin’s farm is a pilgrimage everyone should make. He’s a retired airline mechanic and knows more about mirlitons than anyone I know. He has been growing them for five decades, first in Peal River where he was raised, and later in Pumpkin Center where he bought his 20-acre retirement farm. He grows everything; pecans, figs, beans, berries, bees, chickens.
He has a quality found in most successful gardeners–a healthy curiosity. He wanted to know why he had success as well as failures. And failure and mirlitons often go together in the poor sandy pinewoods soil of the area called the Florida Parishes. I have heard people in the region say, “They won’t grow up here.” At first, I thought that they were using the wrong variety, or planting them incorrectly. Ervin taught that the problem was not the soil, it was what was beneath the soil.
Soil sample tests tell you a great deal, but they won’t tell you what you need to successfully grow mirlitons. Mirlitons are shallow-root plants and they sink or swim depending on subsurface drainage. If the soil doesn’t drain quickly enough, the roots can’t absorb oxygen, and the plant founders or dies. Building a raised bed on top of poorly-drained soil may result in a mud boat. The bed has to have an outlet to either absorb or remove excess water. So to succeed, you need to know the geology and history of the land you are gardening on–and Ervin asked the right questions when he first got to Pumpkin Center.
Ervin learned that Pumpkin Center’s soil was considerably different from Pearl River, where he had learned gardening. Pearl River was a loamy basin soil, rich and porous. In contrast, Pumpkin Center was in the middle of the great Piney Flats that stretches from Florida to Texas. It was notoriously bad poor soil—sandy and acidic. When he once had some excavation work done, he saw that solid white clay lay a few feet down–a real barrier to drainage.
I realized that I had never asked those questions about where I was gardening. To grow mirlitons, you have to be part geologist, hydrologist, and historian. You don’t have to become an expert; just enough knowledge to benefit your mirliton.
As I learned more about the history of where I was gardening, I realized that my mirlitons had often thrived in spite of me. I never once had asked what was under that topsoil or what was there 100 years ago.
I do now, thanks to Ervin.
by Lance Hill | May 27, 2022 | How To, Mirliton
Spring mirlitons are normally sold unsprouted because they are picked fresh from the vine in early May. The first step before planting is to sprout the mirliton. You can speed the process by incubating it—keeping it as warm as possible. If it is above 80° outside, place the mirliton in a shaded area. Or you can incubate it inside your home by placing it in a small plastic trash can or 5-gallon container with a lamp or small heating pad on low. The ideal temperature is 80°-85°. This will promote rapid sprouting within 10-14 days. (here is how I did it)
As soon as the seed begins to emerge (sticks out its tongue), it needs to be planted—but differently from the fall ones. In May, temperatures can run in the 90s along the Gulf Coast, and I have found that sometimes they won’t send up a shoot in extreme heat. Instead, the shoot spirals under the seed. (Figure 1).
The solution is simple. Plant the sprout as you normally would, but put a temporary shade cover over it —a milk crate with a piece of shade cloth over it or a piece of cardboard on top will work fine. Cover the crate with chicken wire to ward off varmints. Once the shoot emerges, remove the crate and stake up the vine.
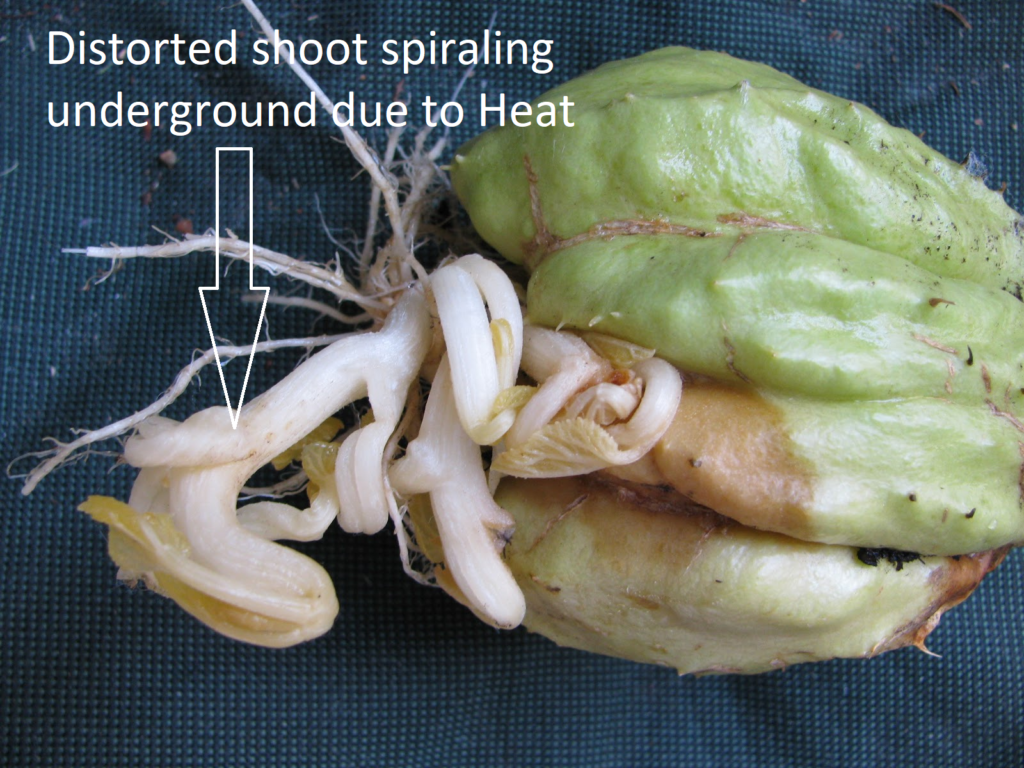
Figure 1.
by David Hubbell | Aug 6, 2021 | How To, Mirliton
By Lance Hill
I remember the day I saw my first Mirliton vine wilting. I almost called 911. My first impulse was to water it, which I did, but it did not revive it that day. Miraculously, the next morning, the vine was in perfect shape.
Figure 1: Healthy and Happy Leaves orienting toward the sun and no sign of wilt.
Two Types of Wilt:
There are two types of wilting with mirlitons: temporary and permanent. They are different by degree, but while the temporary wilt can be fixed, the permanent one is a more serious problem. Knowing how to recognize a temporary wilt will help prevent it from getting worse.
Mirlitons are part of the cucurbit family along with cucumbers and melons. Cucurbits that have large, paper-thin leaves lose a great deal of moisture during hot weather—sometimes more quickly than the roots can replenish it. The moisture balance is also complicated by the plants’ shallow root structure. Mirlitons have two ingenious responses to excessive daytime heat: (1) they collapse their leaves so there is less surface exposure to direct sun (stress avoidance), and (2) they wait until the cooler nighttime to uptake more water into the leaves. It’s like humans fighting the heat by wearing a hat and shirt to reduce exposed skin surface and drinking water in the shade to rehydrate.
Temporary Wilt:
You can easily learn to recognize a temporary wilt (also called “leaf flagging”). The leaves will have lost some turgidity but not completely collapsed, as shown in the two photos. When you see this, you can use a soil sampler to sample the soil and see if it is too dry at the roots zone (8″ down). You can also use your hands to feel how firm the leaves and stems (petioles) are. The video at the end of this post demonstrates the proper way to feel for a temporary wilt. The last thing you want to do if the plant is in a temporary wilt is to water the vine when it already has plenty of available soil moisture—you will flood the roots and cause root asphyxia which leads to more wilting. Just wait until the next morning, and if the leaves have fully expanded and properly oriented toward the light, you have no problem. In fact, periodic wilting toughens and leaves and gives them more protection from fungi. 
Figure 2: Temporary Wilt. Note that the leaves are no longer oriented toward the sun and are drooping, but not their stems (photo by Kevin De Santiago)
Permanent Wilt:
Permanent wilting is caused by disease, pests, or overwatering that blocks the entire flow of water from the roots to the leaves. If you wait until morning and the leaves are still severely wilted, you have a serious problem. Unfortunately, there is no verified solution to these fungal toxins and insects like vine borers that block the uptake of water. August is the month that anthracnose will most likely attack the mirliton because of heat and frequent rains. There is a link below to how to diagnose anthracnose. But don’t worry: mirlitons can usually withstand a bout with anthracnose and still produce some fruit in the fall. In fact, the vine will acquire increased immunity from anthracnose each time it battles it.
.
Figure 3: Permanent Wilt. Note how even the leaf stems are drooping

Figure 4: Bad news. This is the first sign in leaves of anthracnose. The wedge-shaped pattern of leaf death and the rifle shot hole are clear signs that the disease will soon spread to the stems and block the flow of water.
The reason leaves wilt or hold their shape is because of water pressure. It’s the same reason a limp balloon becomes firm when inflated with air. The key is what scientists call “turgor pressure.” Understanding the simple science of turgor pressure will equip you to identify the difference between temporary and permanent wilting. This short video explains turgor pressure. How to use your hands to test for a temporary wilt. <a href= https://www.mirliton.org/wp-content/uploads/2018/09/Identifying-and-Managing-Anthracnose-in-Mirlitons-FAQ-revdise-2018.pdf
Recent Comments