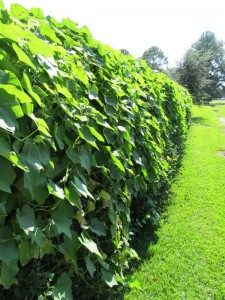
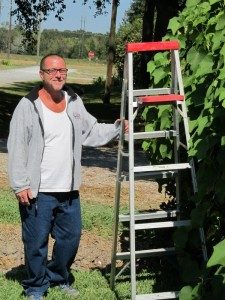
Here are some photos of Kevin Boutte’s mirliton vines in the Teche area of Louisiana

MIRLITON.ORG
Here are some photos of Kevin Boutte’s mirliton vines in the Teche area of Louisiana


Jeanette Bell is doing some remarkable work on bringing fresh food to inner-city neighborhoods in New Orleans. I first learned about her work from this short video about her mirliton vine in her Fleur d’Eden on Baronne street in New Orleans. It turns out that she received her mother plant from Pam Broom last year (see below), which means that it was the “Joseph Boudreaux” Louisiana heirloom variety that we provided to Pam two years ago. Jeannette distributed 70 plants from her mother plant last year, so the Boudreaux variety in expanding exponentially in New Orleans! Jeannette also runs the Garden On Mars project that instructs people how to convert abandoned lots into urban gardens. Here is a recent article on Jeanette’s work.

Jeannette Bell
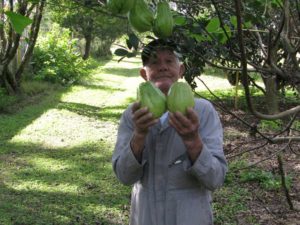
(Joseph Boudreaux with his home-grown mirliton variety)
Part of the inspiration for forming Mirliton.Org was the impact of Hurricane Katrina on New Orleans the the Louisiana coastal parishes. Mirliton plants will die if the roots are submerged in water for more than 48 hours: The Katrina flood destroyed all the vines in flooded areas in New Orleans and some coastal parishes.
To renew the tradition of backyard mirliton growing, we had to find traditional heirloom mirliton varieties grown outside New Orleans. The mirlitons sold commercially in grocery stores (as Chayote) could not be used as seed: they are largely imported from high altitude sites in Costa Rica and Mexico and although they will sprout and grow a few stems, like many high-altitude plants, they normally succumb to our unique growing environment and plant diseases.
Since 2007, we have searched for growers of what we call traditional “Louisiana heirloom mirlitons” by advertising in the Louisiana Department of Agriculture publication “Market Bulletin” and contacting Parish (county) Agricultural Extension Service staff–thanks to the assistance of the Louisiana State University extension service. We also simply drove the roads along the bayous where mirlitons were traditionally grown on bayou banks (that’s how we found the Mister Rock mirliton variety).
We eventually found growers who had been growing the same variety for decades, although they are few and far between and a disappearing breed. With the discovery of these growers–most of them older gardeners in their eighties who were upholding a family tradition of mirliton growing, we knew now that the traditional locally-grown varieties would once again thrive in New Orleans and rest of the state.
These growers would donate seed mirlitons to re-seed New Orleans and, as the demand grew, we would also buy from growers and give away the seed as sprouts and plants. As word spread of our project (which began under the name “Adopt-A–Mirliton”), we ended up distributing seed throughout Louisiana, Texas, Mississipi, and Alabama. We decided to feature some of the success stories on this blog from time to time.
In 2010 a reader of the Market Bulletin called me and said he knew of a grower in Broussard, Louisiana who had several vines of the same variety that he had been growing for decades. I visited Joseph Boudreaux in Broussard and he donated a few of his mirlitons and I purchased several more. Later, after an early freeze, he donated a few dozen freeze-damaged fruit that he assured us would germinate and grow: he was right.
We always name the variety after the person we first found growing it so that we can track the variety’s progress as we distribute it throughout the region; heirloom varieties have different qualities that we are testing for, such as fruiting habits and disease resistance. Naming the variety also allows us to find new growers who will “adopt” a specific variety and commit to growing it so that we will always have a reliable seed source and can preserve the genetic diversity of the locally grown varieties.
In 2011, Mirliton.Org donated three container plants of the Joseph Boudreaux variety to Sun Harvest Garden in New Orleans on Oretha Castle Haley Boulevard. A small Central City community garden built on a cleared lot, Sun Harvest is run by Pam Broom, a long-time community activist and urban farming advocate. Planted in the spring of 2011, the vine produced a small crop later that fall. During the warm winter of 2012 (we never got a frost in central New Orleans), Pam harvested even more fruit and the plant is still producing during the traditional spring crop cycle.
Pam has distributed some of the the new fruit as seed to other gardeners in the area and her vine is, as mirlitons are inclined to do, rapidly taking over more of her garden. But she’s happy with the prolific new arrival. “One of the things that inspires me most about receiving mirliton plants from Mr. Joseph Boudreaux,” says Pam, “is that thanks to him, I am experiencing growing a beautiful, sweet and delicious variety in the heart of the City of New Orleans.”
From Broussard to New Orleans: mirlitons are making a comeback thanks to people who appreciate this iconic Louisiana plant.

Pam Broom with her Joseph Boudreaux mirliton variety vine at the Sun Harvest Garden in New Orleans
Lance Hill
Mirliton.org
The hot and rainy weather has brought out the annual anthracnose disease for mirlitons. See the last summer’s blog entry here on this disease (I have added a photograph and link to more photos) which discusses how to recognize the different signs of powdery mildew and anthracnose. The growers guide on the web site has additional information. Anthracnose infects almost all mirliton plants, especially in their first year, but depending on proper care and hopefully a low rate of evening rain showers, the disease will only affect a few stems and when those die, new stems will return.
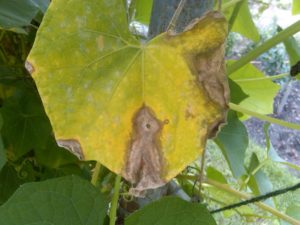
Mirliton leaf infected with anthracnose plant disease. Note different browning pattern and the distinctive “shot hole” in the middle of the brown tissue, which does not occur with powdery mildew (anthracnose, unlike powdery mildew, can live on dead plant tissue and literally “eat a hole” through the plant)
I just posted to our FAQ page a comprehensive article on powdery mildew in Mirlitons. I tried to get it to fit on the blog but apparently blogs are for concise thinkers–that rules me out. Visit the FAQ page and Garden Blog for new useful information.
Lance Hill, Mirliton.Org
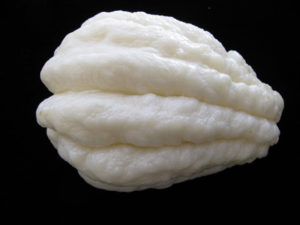
Ishreal Thibodeaux Variety Mirliton. This is the only pure-white mirliton that we know of in the South.

Mirlitons (Sechium edule) in the United States south have two main fruiting seasons that begin after the spring and fall equinox, which generally means flowering begins in May for several weeks and again in October until December. The plant initiates flowering in response to leaf signals when leaves detect equal periods of light and darkness (photoperiodism). This stimulus is combined with temperature changes (thermoperiodism) in the fall: a cold snap after the equinox can help stimulate flowering. Spring crops are normally much smaller than the fall crop.
This early crop has created an opportunity to use the winter/spring fruit for seed. But these cool-weather mirlitons can be a little cranky if panted in hot weather.
Spring fruit can be used as seed but must be planted using special methods. The goal is to get the sprouts into the ground as soon as possible so they can develop a root structure sufficient to meet the water needs of the top growth when temperatures reach 90 °F as early as May. Unlike containerized plants or seeds that were planted the previous fall, these sprouts begin the summer with no root structure.
Spring fruit should be allowed to mature for at least three weeks on the vine and meet the “thumbnail test”: press your thumbnail into the skin and if the fruit flesh is soft and the nail leaves a dent, then the fruit is not ready to pick. Also if you are familiar with the heirloom variety that you are growing, you will know the average size of a mature fruit. The fruit must be mature to be able to germinate and sprout.
Hot Weather Planting of Sprouts:
During normal growing cycles, the fruit may not be ready to pick until late May and won’t sprout until June or later. Temperatures over 90°F. can suppress shoot and root development and dehydrate the seed fruit that is exposed to the sun. I’ve done that in the past–planted a sprout in June and watched it sit there and do nothing. When I excavated it, I saw how distressed the seed had become by the scorching sun. Instead of coming up, the shoot stayed below ground and wound in a circle.
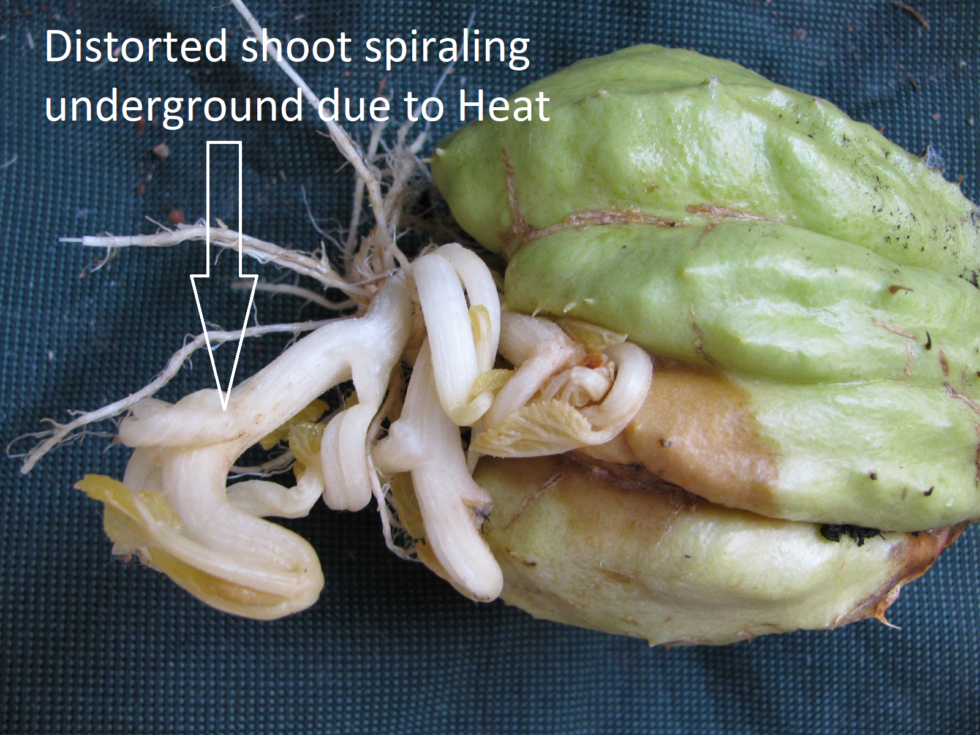
So sprout-planting in May and June should be done as you normally would, but place a milk crate over the planted sprout and cover it with shade cloth. This will protect it from the intense solar heat. The milk crate will also protect the mirlitons from squirrels and other rodents that like tender young fruit.
Once the shoot begins to grow, you can remove the crate and stake the vine.
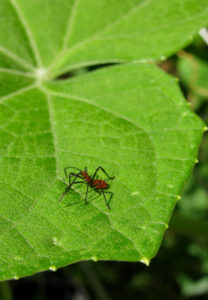
Because of the warm winter, we have been getting an early crop of mirlitons that started in February. I noticed these gelatinous clear growths on the immature fruit and then spotted an immature and mature leaf footed bug (stink bug) that feed on the fruit.
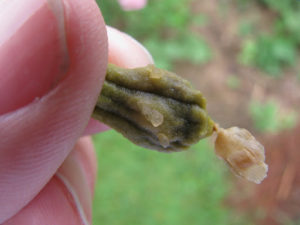
Fruit fluids (cytoplasm) leaking from fruit and jelling. Note flower and fruit are dead
Dr. Dale Pollet of LSU identified these growths as the cytoplasm (fruit fluids) oozing from the fruit after the leaf footed bugs have penetrated the fruit skin to feed on it. In this case, attacking the very small immature fruit kills the fruit. I have seen the insect also try to feed on mature fruit which does not display any immediate damage but will manifest as brown bruising after the fruit is picked. They also spread plant diseases. The best method of control is to pick the insects off by hand, but they can be treated with organic fungicides. If you use an organic pesticide, be careful that it is not toxic to bees (it is pollination season) and that it is not phytotoxic (can damage leaves in high temperatures). Test it on a few leaves for one week first.
69
Immature Leaf footed Bug on Mirliton Leaf
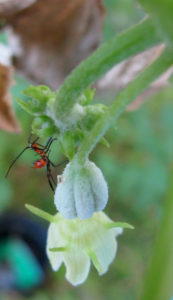
Leaf footed bug feeding on flowers. They can block pollination tubes.
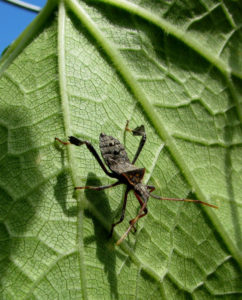
Mature Leaf Footed Bug (stink bug)
Lance Hill
Mirliton.org
September 23rd will be the autumn equinox which means that in about 10 days we will have equal daylight and darkness. Since mirlitons (chayote) are photoperiodic (flowering triggered by equal light), we should start to see some flowering soon. Mirlitons are also thermoperiodic which means a little cool weather will also stimulate flowering. Here are a few things to keep in mind for the fall crop:
1. Don’t fertilize during this period. Mirlitons require additional nitrogen when they first start and throughout the vining stage, but they produce more fruit in the fall if they have less available nitrogen. This is always one of the tricky things about mirlitons–they have different nitrogen requirements at different times. This is a challenge for growers using manure since it is slow release, but the slow release fertilizers, natural or synthetic, are a good way to avoid excessive nitrogen.
2. Watch for leaf footed bugs ( a variety of stink bugs). There are photos of them on the web page photo site. Immature leaf footed bugs are red and easy to identify. I have seen that they will feed on flowers and fruit–leaving the fruit with late bruising and a bitter taste. They are easily treated with organic pesticides or just manually picked off. Various beetles can cause damage to leaves and stems and introduce wilt and other diseases and they can also be treated. In many ways, the traditional overhead trellis makes it difficult to detect and treat insects, so there is an argument for a lower trellis. In addition, a 4-5 foot trellis permits for easier hand-pollination and the trellis can be more easily covered with plastic to protect from cold temperatures.
3. When is a mirliton ripe? Most fruit will mature within 21 days of flower germination, and the “thumbnail test” is the easiest way to test for maturity. Simply press youth thumbnail into the flesh and if it dents the flesh easily, the fruit is immature and still contains too much moisture and not enough structure. I mature mirliton will be hard and resist denting. Some growers like larger mirlitons (the average at picking, depending on the variety, is 8-12 ounces). You can leave the fruit on the vine for several weeks and some heirloom varieties will get very large–up to 30 ounces. Other varieties have a terminal fruit growth of about 10 ounces. The older the mirliton, the more fibrous the flesh. Again, it is a matter of taste and you can experiment with picking and boiling at different sizes.
5. Pollination. Bees are the primary pollinators for mirlitons. Bees are finicky and systematic feeders and simply having them in your garden does not mean they will pollinate your plant. Go out about 10:00 a.m. on a sunny day and see if they are visiting your mirliton flowers. If they are not, you have to hand-pollinate per the instructions on the photo site or you can spray with Fruit Boost or other artificial queen bee hormones. Only one pollination is necessary since the pollen is sticky and adheres to the female stigma. Mirlitons will flower from October through December if the weather is warm, but hormone levels drop off after November so germination rates are lower.
6. Protect from cold weather. You can take your chances with cold weather, but immature fruit will die when temperatures drop below 55 degrees F. If you want your mirlitons to survive cool weather damage or frost damage, invest in a large roll of plastic, a drop light, and a receptacle thermostat (see growers guide). By covering your vine and keeping the temperature above 60 degrees, you will protect the new fruit and be able to harvest all the way through December. You may have to removed the plastic during the day to prevent overheating. Freeze damaged fruit cannot be eaten but they do grow well as seeds if they are planted immediately on containers or mounds.
7. In the growers guide, we suggest several methods of overwintering sprouts. Leo Jones of Marrero, Louisiana told me of good technique of overwintering sprouts if you don’t have container room. He digs a hole in the garden and fill it with straw and places several mirlitons in the hole and covers with soil and mulches. He digs these up in march and they have developed a good root structure and shoot and can be transplanted to mounds (bury the roots and shoot completely to avoid sun scorching. If you are going to store mirlitons in paper bags (the old fashioned way, which we don’t recommend), follow the instructions in the growers and powder the fruit in sulfur to protect them from fungi.
8. As always, send us photos of your plants. We are always looking for different heirloom varieties, so feel free to email us about growers in your area. This last summer we had an anthracnose epidemic which damaged many of the vines in the Southern part of the state, but rest of the state had low rainfall so we expect a good crop of heirloom mirliton seeds. If you are subscribed to the “Alerts” on the web site, you will be notified when seed is available through cooperating garden centers or directly from growers. It is always advisable to start with 3-5 sprouts to increase your chances of getting a plant through the first year, which is the key to a healthy and productive vine. Second-year plants have better root structure and “systemic acquired resistance” means that plants exposed to fungal toxins like anthracnose will develop some natural resistance to the fungus in future years.
Lance Hill
Mirliton.org
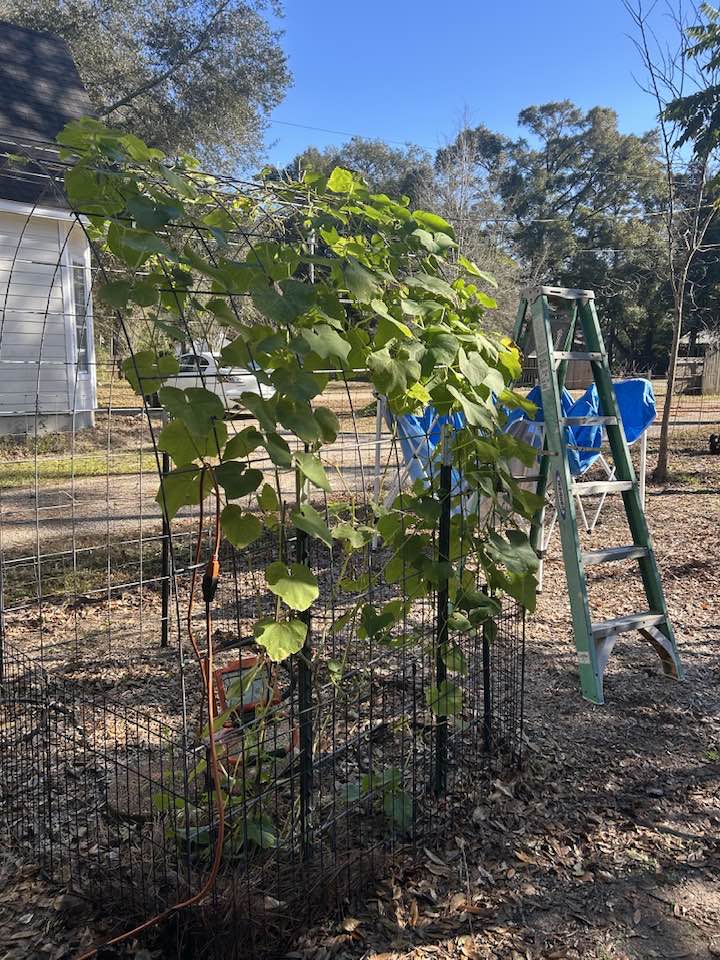
Cattle Panel Arch
Proper trellis material is critical for successful mirliton growing. What’s the best material? The short answer is cattle panels. They have the perfect gauge of wire and the ideal mesh size. They come in 4-6 gauge wire diameters and different mesh sizes, but you will want at least 4″ x 4″ so the fruit will hang below the trellis.
Here’s why. For decades, “backyard mirlitons” were grown vertically on the common “chain link” fence with 12 gauge, (1/8 inch) wire. With the advent of the wooden “security fence”, home gardeners lost their built-in trellis. Moreover, research demonstrated that mirlitons fruit more prolifically on horizontal trellises, growers searched for alternative trellising. The problem was that those old chain link fences held a secret: the wire was the perfect diameter for mirliton tendrils. When growers used chicken wire, lathe, bamboo poles, plastic mesh etc. the results were not good. If trellis materials are too large in diameter, the tendrils will not hook and coil and the plant will not grow and extend vigorously; the same is true for materials too small in diameter.
Mirlitons are herbaceous climbers that, in addition to leaves and flowers, have separate tendril structures that branch out in two to five smaller branches. These are slender, string-like coiling climbing organs that are sensitive to contact stimuli. When they come into contact with the correct diameter object, they coil around the object to provide support for the main stem and subsequent fruit. The tendril coils tightly around the anchoring object and coils backward to the plant, creating both an anchor and a spring-like coil. This secures the plant against wind—allowing a little sway—and holds up the stem when fruit begins to weigh it down. Mirliton tendrils are strong but delicate and do not regrow once damaged.
Although the signaling mechanism is not entirely understood, my observation is that when tendrils hook onto a support structure and exert tension on the stem, the meristem (stem tip) is stimulated to grow and extend. A mirliton stem can grow more than 20 feet, and more stem growth means more fruit production. If a stem is grown on a horizontal trellis or arbor with supports that are too large in diameter for the tendril to wrap around, the tendrils will coil unattached in the air, and stem growth will slow if not stop completely. In a sense, the plant only extends to areas that can provide support, and tendrils extending in front of the stem probably exert tension on the main stem, signaling the direction of stem growth and increasing meristem (stem tip) extension. Improper trellis material that does not provide structures for tendrils to hook and coil on can result in stunted plants and stem breakage from wind or fruit weight.
The trick with trellising—and it is a simple trick—is to use trellis support materials that tendrils can easily and readily attach to. That means first providing the vine with support to climb vertically. This is best done using “tomato cages” which are typically constructed of 1/8 inch galvanized wire and then providing string supports to the overhead trellis, using a 3-strand poly twine that is at least 1/8 inch diameter. If you don’t have room for a horizontal trellis, then any wire fencing 4 gauge or thicker will work fine. The mesh size is not important since the fruit will hang on the side of the support structure.
Horizontal trellises need the same minimum wire size. For decades, Louisiana mirliton growers have used overhead trellises with a solid wood framework (4×4 posts and 2×4 rails) covered with “goat fencing” or similar fencing material. Goat fencing is galvanized steel 4” x 4” square pattern fence mesh that is hinge lock woven. The hinge lock makes it easier to work with than welded fence, and the 4″ mesh is large enough for fruit to drop through and hang below the trellis. But you will have to build support for it because it’s not as rigid as welded cattle panel.
The key is that the wire is at least 4 gauge, (1/5 inch). Tendrils do not hook and anchor well on string or wire with diameters less than 1/8 inch. I recently saw a string trellis that used 1/16 inch string and the tendrils refused to hook to it. From an evolutionary perspective, the plant is searching for structures that can support it from wind sway and fruit load; a small twig won’t work and a large branch won’t permit a tight coil. What we have lying around the yard might look like a good trellis idea (PVC pipe, bamboo, old 2x4s), but your mirliton might not agree. This is why cattle panels, with their 4 gauge wire and large mesh, work best. )If you decide to use nylon netting instead, this is the ideal cord diameter and mesh size netting.)
There are many trellis material options other than galvanized fencing. Many growers use heavy concrete reinforcing mesh, which is sold in panels, not rolls, and can often be found in recycling centers. It has a 6”x6” square mesh and is a thicker 9 gauge, which tendrils appear to respond well to. Always be careful to bend in sharp end pieces to avoid accidents (masking tape works remarkably well in blunting end cuts). Also, keep in mind that long stems and plenty of trellis space ensures that leaves are exposed to sun and air circulation which inhibit plant diseases and insect infestations.
Finally, one of the most important steps in trellising is augmenting the vertical path so that new lateral shoots from the bottom of the plant have a pathway to the top since each one of these shoots means more fruit production. It is also important to keep lateral shoots from contacting the ground since soil-borne fungi are transmitted to leaves, and although the ground stems will bear fruit, they are more susceptible to insects. This means that as new lateral shoots emerge, tie thick poly twine to the wire cage at the base and connect it to the overhead trellis at an angle, and pull the string taught. Then gently wrap the new shoot once or twice around the string so tendrils will hook and the shoot has a separate path to the top of your trellis. When a plant begins to grow vigorously, there may be a need to add multiple string paths to spread out the plant at the top and avoid stems from falling over due to their own weight. If you have any question about the appropriateness of a trellis material, simply watch the plant closely and note if the tendrils are hooking and coiling around the material properly. You will find several photographs of properly constructed mirliton trellises on our website’s photo page.
The recent deluge of rain in South Louisiana has certainly underscored the need for what I call “single event gardening.” What this means is that in ordinary weather conditions and plant disease and pest environments, we can simply plant a mirliton (chayote, Sechium edule) and it will take care of itself. But if we want the plant to thrive and survive as a perennial for several years, we need to plan ahead and make provisions for events that may never occur, but if they do, they will certainly reduce fruit production or even kill the plant. Excessive rain is one of those “single events” and right now all over New Orleans, the only city in the United States where we have to garden below sea level and where there is very little natural sub-surface drainage, vegetable gardens are struggling to maintain sufficient air pore space to ensure plant functions. For those who planned ahead, the 3-5 inches of rain a day pose no problem.
When soil is water saturated and no oxygen is available for roots — or for gas exchange–plants go through dramatic changes to survive. They are literally in “anoxic” soil like the dead zones in the Gulf of Mexico. They shift from aerobic metabolism to anaerobic metabolism: they have only 5% of the energy efficiency they have in healthy aerated soil; they produce toxic organic and inorganic compounds and they deprive the leaves of potassium crucial to maintaining leaf functions. After 24-48 hours, not only have the roots been damaged making it more difficult for them to uptake water and nutrients; and leaf functions have been weakened and the whole plant is vulnerable to disease. The result can be that even after the rains have subsided, a perfectly healthy looking plant under heat stress suddenly wilts, turns brown and dies to the root.
The solution is very simple. You need two things: a fast-draining, well-aerated growing medium (comparable to high-quality commercial potting mix) and you need to elevate your soil so that the only exit route for excess water is not the saturated ground soil which cannot absorb any more water. This means either a planting hill system using 4-6 cubic feet fast-draining mix or a raised bed that has at least a 5 inch gravel base and 18-24 inches of good-draining soil. Installing a french drain pipe inside the raised bed is also suggested. All these methods are demonstrated on the photo section in “mirliton 101” on our web site at www.mirliton.org and covered in the two growers guides.
Plant disease this year was compounded by the long, dry, hot spring which was conducive to powdery mildew (Podosphaera xanthii), a particularly dangerous fungus comprised of at least 28 “races”. Although is not as prevalent as other plant diseases that afflict mirlitons, it can be deadly since most of our locally-grown heirlooms are not resistant to this air-borne fungus. Fortunately, powdery mildew (PM) can be eradicated by the natural fungicide potassium bicarbonate (pb). Click here to see photo album on PM and recommendations on using potassium bicarbonate.
The big headache this summer is the plant disease anthracnose caused by the a fungus named Colletotrichum lagenarium. It is a chronic problem with mirlitons and it is the main reason plants die the first year. It is relatively easy to distinguish anthracnose disease from powdery mildew (PM) since it is a soil-borne fungus and normally splashes up on the bottom leaves and travels from leaf-leaf in a linear fashion. While both PM and anthracnose start with similar symptoms (yellow splotches on green leaves), anthracnose is a more versatile fungus–the scientific terms for its mode of parasitic activity are biotrophic, saprotrophic, and necrotrophic–which simply means it can live off live tissue or dead tissue.
This means the fungal pathogen will destroy a section of the leaf turning it yellow, then consume the remaining section until it is brown (necrotic) and it will quite literally eat a hole through the plant. The brown hole in the leaf or on the edges is an easy way to diagnose anthracnose. PM, in contrast, is an air-borne spore that can deposit at the top of a plant and is not as versatile; normally the leaf will simply uniformly turn yellow and wilt before dead (necrotic) paper-like spots with holes appear. It is always best to send a leaf sample to your local extension office for a definitive diagnosis, but the photo section of our web site offers several free ways to make a tentative diagnosis.

Mirliton leaf infected with anthracnose. This is a good example of the signs of anthracnose. The fungus starts on living tissue but also has the ability to extract nutrients from dead tissue. Note distinctive anthracnose “shot hole” in middle of now dead tissue where fungus has fed on dead tissue–unlike powdery mildew. Wedge-shaped yellowing or brown (dead) patterns starting at the leaf edges also distinguish anthracnose from powdery mildew. Anthracnose travels through plant cells so tends to follow leaf vein design. Powdery mildew spreads on the surface of leaves, so there is less conformity to leaf vein structure (initial yellow splotches overlap veins) and more generalized yellowing of entire leaf and browning/wiling of entire leaf simultaneously.
Normally when anthracnose infects the leaves, petioles, and stems, it will eventually split the stem and that will prevent the flow of nutrients to the ends of the stem. But for every stem lost, a healthy plant in well-drained soil will send up a new shoot. So for the first year it is a tug-of war with the disease but generally the disease will abate in August. Click here to see more photos of infected leaves (click on photos to enlarge).
One important discovery we made this year is that the light-brown “bark” that forms at the crown of the plant is a lignocellulose covering (lignin and cellulose strengthen woody plants) which the anthracnose hyphae “germ tube” cannot penetrate. This protects the base of the plant from the fungus and almost all new growth will originate close to or below this bark. It is important not to cover this protective bark with applications of compost, mulch, or manure since it may weaken the bark (manure can always be spread at least 6 inches from the base since roots will eventually extend up to 6 feet in all directions).
Currently, there are no scientific tests on organic fungicides to treat anthracnose, but there are some biological and soft-chemical treatments that have been tested on other related plants. But keep in mind that mirlitons are unique and the effect of treatments on tendril action is important, since tendril growth (anchoring to the trellis) appears to stimulate meristem growth (shoot tip growth). For now, the best protection against anthracnose is (1) use only locally grown heirloom mirlitons for seed since they probably have more resistance to the disease (otherwise they would not have survived for decades in our region); (2) plant in well-drained, aerated sites; (3) provide plenty of trellis space so leaves can spread out and get maximum exposure to sun (a natural fungicide) and air circulation; (4) use a horizontal trellis where possible to avoid leaf crowding; and (5) use sanitary practices so as not to transfer anthracnose spores from one leaf to another (watch where you put your hands and disinfect tools). Once leaves and stems are brown and dead, remove them and dispose away from the mirliton. Anthracnose creates spore-producing “ascocarps” that contain spores and can live in the soil for up to a year.
Finally, play the odds and always plant multiple plants. Raising one mirliton is tricky, but raising several increases the odds that you will make it through the first year. If you treat the soil for root-knot-nematodes (see the guide) and protect the plant from root freeze, each year the plant will become more resistant to anthracnose–more capable of producing new shoots to compensate for damaged shoots.
These are all “single event gardening” guidelines. You can just plant the mirliton and it is possible that none of these environmental or disease problems may occur and your plant will do well. On the other hand, if you take precautions, the health of your mirliton is secured. Given that mirlitons become more resistant to disease as they mature, and given that fruit production doubles every year if maximum root-space and trellis-space is provided (from 40 fruit, to 80, to 160, t0 350), the protections to ensure a multi-year plant are worth the time and effort. Lance Hill Mirliton.org Lance@mirliton.org