
The spring harvest of mirlitons has increased in recent years due to advancements in growing techniques. The question is: How do we plant them?
There are two options: container-grown plants or planting them directly in the soil.
First, in either case, the fruit needs to be spouted. This ensures the seed is viable, and a sprouted mirliton means the roots and shoots are ready for soil and will quickly root and grow. You can expedite sprouting by incubating the fruit. If kept warm, they will sprout within 7 to 14 days. Read how to do it here. (We encourage growers to also incubate their sprouts before selling or gifting them, for the same reasons.)
Once the seed has sprouted:
Container planting: Plant it in a 3-gallon container and keep it outside in the shade for the summer. Use a small tomato cage for a trellis. Mirlitons can be easily pruned back to maintain a compact shape if desired. Transplant them into the ground in September, after the danger of the heatwave has passed. Cut it back and mulch it in November, or tent and heat it for the entire winter. Either way, you’ll get a good spring crop. Use the bamboo stake technique for gauging watering needs.
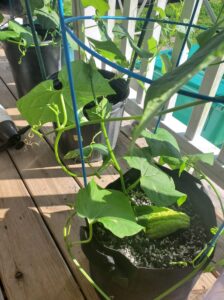
Mirlitons trellised on tomato cages.
Direct planting: This is a little more tricky. You can plant sprouts in May or June, but they will need to be initially shaded from the heat of direct sunlight. Place a milk crate over the plant, covering it with a 40% shade cloth or a piece of cardboard to protect it from the sun’s rays. After it starts to grow foliage, remove the crate and shade. Read about shading it here. Use the standard methods for bed preparation in the quick guide